3D Renovation Works: From Client Vision to Permit Submission
Introduction:
3D renovation works permit submission represents a significant advancement in the field of construction and urban planning. By leveraging 3D modeling technology, contractors and homeowners can create detailed visual representations of renovation projects with unparalleled precision. This method allows for precise planning and accurate depiction of proposed changes, ensuring compliance with building codes and regulations.

Submitting permits in 3D format streamlines the approval process by providing a clear, comprehensive view of the project to regulatory authorities. This reduces ambiguities, minimizes the chances of miscommunication to a significant extent, and accelerates the review process. Additionally, 3D submissions facilitate better project visualization, enabling stakeholders to foresee potential issues and make informed decisions early on. Overall, this innovative approach enhances efficiency, accuracy, and transparency in renovation projects.
3D Renovation Works: From Client Vision to Permit Submission
Recently, we embarked on a project that exemplified the transformative power of 3D rendering, where we created a detailed 3D rendered image based on the specific instructions provided by our client.
Understanding the Client’s Vision
The task was to create a 3D-rendered image aligned with the client’s vision for a building renovation. The client’s requirements were precise: remove the white overhang from the building, extend the siding down to meet the top of the windows underneath, paint the siding white, the brick red (with options), and the trim white.
Initial Steps: Gathering Resources
The client supplied us with a CAD file and reference images. These resources were crucial as they provided the foundational details needed to model the building in 3D accurately. Our first step was to thoroughly review these materials to ensure we fully understood the scope and specific requirements of the project.
Step-by-Step Process
Our client had a clear vision: they wanted to create life like 3D models of their dolls, complete with realistic fur details, and ensure these models were animation-ready. To achieve this, we followed a meticulous process, gathering reference materials and creating initial sketches.
1. Confirmation of Areas to Be Modified: We began by marking the areas to be removed and modified using rough red and yellow lines on the provided images. This step was essential for confirming with the client that we had correctly identified the parts of the building to be altered.
2. Approval and Basic 3D Modeling: Once we received the client’s approval on the marked areas, we created the primary 3D model. At this stage, we provided two options to the client:
- Option 1: The model with the existing overhang.
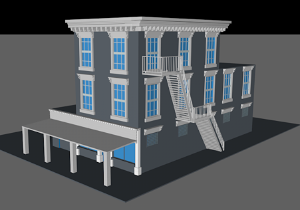
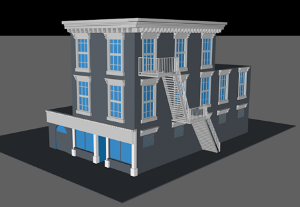
- Option 2: The model without the overhang.
3. Adding Textures: After the primary model was approved, we moved on to the texturing phase. Textures bring the 3D model to life by adding color, patterns, and realistic surface details. We carefully selected textures that matched the client’s specifications: white siding, red brick (with variations for the client to choose from), and white trim.
4. Lighting Integration: After the textures were approved, we integrated lighting into the 3D scene. Proper lighting is crucial in 3D rendering as it enhances the realism of the image, creating shadows and highlights that give depth and dimension to the model. We used 3D lighting techniques to ensure the final render would be visually compelling and accurate to life.
Please visit to this page:
Technical Aspects of Rendering
To achieve the high-quality render required for this project, we utilized Cinema 4D along with Octane Render. Here’s a brief overview of our process in these tools:
- Cinema 4D: We used Cinema 4D to build the 3D model from scratch. This involved creating the basic shapes, applying the textures, and setting up the lighting. Cinema 4D’s powerful modeling tools allowed us to recreate the building using CAD files and reference images accurately.
Delivering the Final Version
After incorporating all feedback and making the necessary adjustments, we rendered the final version of the 3D image. The final render showcased the building without the overhang, with white siding, red brick, and white trim, exactly as per the client’s instructions. We provided the client with multiple options for the brick color, allowing them to choose the one that best fit their vision.
Conclusion
This project was a testament to the collaborative process involved in 3D rendering for architectural renovation. By carefully following the client’s instructions, iterating based on feedback, and utilizing advanced tools like Cinema 4D, we delivered a high-quality, photorealistic 3D render that met the client’s requirements. The final image facilitated the client’s decision-making process and played a crucial role in the permit submission, ensuring that all modifications were clearly communicated to the relevant authorities.
The successful completion of this project underscores the importance of precision, communication, and technical expertise in 3D renovation works. It highlights how 3D rendering can bridge the gap between a client’s vision and the final approval, providing a clear, detailed, and accurate representation of proposed changes. Whether for client presentations,3D renovation works., or marketing
At VideoChef, we are committed to bringing your architectural visions to life with precision and creativity. For more information about our 3D rendering services or to discuss your project, please visit our contact page on videochef. co. Let’s turn your ideas into reality.